The 96-Inch Ceiling vs. The 45-Inch Driver
I was standing in my garage last Tuesday evening—June 2026 now, and I still can’t believe it’s been two years since I cleared out the lawnmower and the kids' old bikes—staring at the same 8-foot ceiling that nearly broke my spirit back in 2024. If you live in a standard suburban house, you probably have 96 inches of vertical clearance. On paper, that sounds like plenty for a guy who is five-foot-eleven. In practice, when you are trying to recreate Pebble Beach in a space that usually smells like lawn fertilizer and wet dog, those 96 inches disappear the moment you start your backswing. I realized early on that if I used a standard ceiling mount, I would be putting a seven-hundred-dollar lens exactly where my follow-through ends. The fear of a shattered projector is more real than the fear of a 3-putt, mostly because a 3-putt doesn't involve explaining to your wife why there is glass on the hood of her SUV (she has already banned any new sim purchases until December 2026, so I’m playing for keeps here).
When I pulled the trigger on my SkyTrak setup, I figured the projector would be the easy part. I’m an IT operations manager; I deal with hardware deployments for a living. But a golf simulator projector isn't like a home theater screen. It is more like a home theater screen that gets hit by a 70 mph projectile—or in my case, a golf ball that I occasionally thin directly into the frame. Mounting a projector in a low-ceiling environment is a game of inches. I spent about three weeks of testing different positions before I finally stopped flinching during my swing and started trusting the real garage golf simulator space requirements for a full swing that I’d measured out a dozen times.
Mapping the 'Dead Zone'
Before you drill a single hole into your drywall, you have to map the Dead Zone. This is the area of your ceiling where a golf club is most likely to make contact with hardware. For me, as a 14-handicapper with a tendency to get a bit 'over the top' when I’m tired, the Dead Zone is a roughly three-foot radius around my head and trailing back toward the garage door. I spent one cold evening with a metal tape measure, standing perfectly still in my hitting stance. I was measuring the distance from my driver head to the lens, realizing that if I mounted this thing directly overhead, I was one aggressive transition away from a very expensive repair bill.
The math is unforgiving. You have your 8-foot ceiling. You have to account for the garage door opener track, which usually eats up another few inches. Then you have the projector's vertical offset. This is a term I had to Google four times before it clicked: it’s basically how far below the center of the lens the top of the image starts. If you mount the projector flush to the ceiling, but it has a large vertical offset, your image is going to be halfway down your impact screen, leaving a giant gap at the top. If you drop the projector down to fix the image, you’re back in the Dead Zone. I’ve realized that in a low ceiling, you have to prioritize swing clearance over image perfection every single time.
The $20 Failure and the Saturday Return
Like any guy trying to keep a $5,000 build from creeping toward $6,000, I tried to save money on the mount. I bought a generic 6-inch drop mount because the reviews said it was 'sturdy.' It was sturdy, alright. It was also a literal obstacle course. I installed it, stepped into my hitting bay, and immediately realized that the projector was hanging low enough that I could see it in my peripheral vision during my takeaway. It felt like trying to swing a club in a telephone booth. I spent one Saturday afternoon taking it all down, packing it back into its frustratingly small box, and driving it to the UPS drop-off. If you’re building a garage sim, do not buy a mount that drops more than two inches unless you have 10-foot ceilings. You’re just buying a target.
I needed something that stayed out of the way but still gave me a clear 1080p image on the screen. I ended up with a professional-grade low-profile projector mount with a depth of only 1.26 inches. It cost about fifty bucks, which felt like a lot for a piece of metal, but it was the most important fifty dollars I spent in the whole build. It tucked the projector right up against the ceiling, gaining me nearly five inches of clearance compared to the cheap one. This was especially important because I had already invested in the best golf hitting mats for garage simulators to save your joints after my 2023 knee surgery, and those mats add another inch or two of height to your stance. You’re essentially losing ceiling height from the floor up and the ceiling down simultaneously.
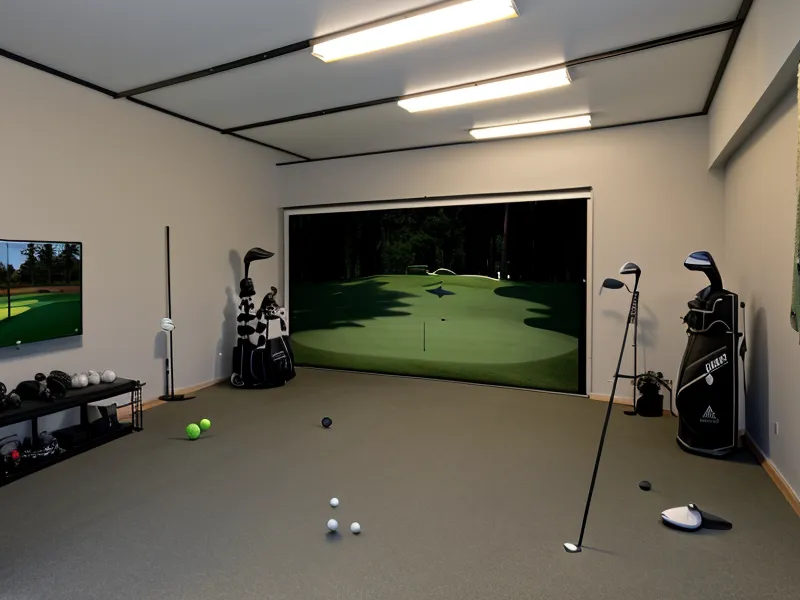
The Side-Mount Compromise: A Contrarian Approach
Most guides will tell you to mount your projector perfectly centered with your hitting line. If you have the height, that’s great. But in a suburban garage with an 8-foot ceiling and a garage door track in the way, centering is a recipe for disaster. This is where I took a different path: the Side-Mount. Instead of putting the projector in the line of fire, I moved it about two feet to the right of my hitting line. This puts the unit entirely out of the swing path of a right-handed golfer. Even if I lose my balance or have a catastrophic 'Happy Gilmore' moment, there is zero chance I hit the hardware.
To make this work, you need a projector with horizontal keystone effect correction and a decent throw ratio. A short-throw lens is mandatory here. If you use a long-throw projector, you have to mount it so far back that you’ll be casting a shadow on the screen every time you stand over the ball. By using the horizontal keystone, I was able to angle the image back to the center of the screen from its off-center perch. IT guy warning: extreme keystone can add a tiny bit of input lag, but for a 14-handicapper playing a casual round at Pebble Beach on a Thursday night, you’ll never notice it. I’ve picked up a few golf sim accessories for a better garage practice experience over the last few months to round things out, but the projector mount remains the most stressful piece of hardware in the room.
Key Considerations for the Low-Ceiling Mount:
- Vertical Offset: Check the manual before you drill. If your projector doesn't have 'lens shift,' you are stuck with where that image lands vertically.
- Mount Depth: Look for 'flush' or 'low profile.' Anything over 1.5 inches is taking up valuable swing space in an 8-foot room.
- Shadow Mapping: Stand in your hitting position and have someone hold a flashlight where you plan to mount the projector. If you see your shadow on the screen, move the light higher or further to the side.
The Tuesday Night Test: Two Years Later
It’s now mid-June 2026, and the setup has held up through two years of Cincinnati humidity and freezing winters. I remember standing there in early 2024, driver in hand, looking at the unit tucked up against the ceiling joists. I took a full rip, 95 mph clubhead speed, and the club cleared the mount with room to spare. The relief was massive. I wasn't flinching anymore. I wasn't looking up at the ceiling mid-swing like I was waiting for a roof leak. My 7-iron carry is still sitting around 155 yards, which isn't breaking any records, but it's consistent because I’m not worried about hitting the ceiling.
There is a specific kind of satisfaction in solving a problem like this with a little bit of IT-style troubleshooting and a lot of measuring. My launch monitor was finally showing me the ball flight I expected because I wasn't subconsciously holding back to avoid property damage. If you’re in the same boat, stop looking at the expensive 'pro' enclosures and start looking at low-profile mounts and off-center placement. Your driver, your projector, and your marriage will all be better for it. Now, if I could just figure out how to stop slicing into the virtual Pacific Ocean, I’d really be getting my money’s worth out of this $5,000 garage project.